Many of us are familiar with importing data into monday.com using the Import Wizard, which is excellent for adding new items. However, in this guide, I’ll walk you through the steps to update existing items on your monday.com boards as well.
If you are not familiar with the Advanced Formula Booster app, designed to reinvent formulas in monday.com, you may want to read The basics of the Advanced Formula Booster. It walks you through the different steps of creating your first formula, then automating it (screenshots + video).
The Workflow
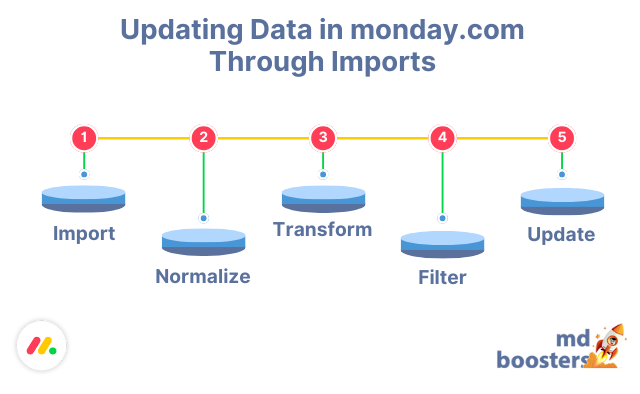
Here is our workflow for the guide:

Step 1: Import
The first step is to create a monday.com board named Imported Data to import your data. For each column in your data source, create a column in the board. Then use the monday Import Wizard to populate the board.
Step 2: Normalize (1 formula – 0 automation)
Once you’ve imported your data, you might need to normalize it to ensure consistency. For example, you might want to format names with only the first letter capitalized and ensure that all email addresses are in lowercase. Additionally, you may need to add leading zeros to numbers to maintain a fixed length. To achieve this, create a ‘Normalize’ formula in the Imported Data board. Use the ‘BoardItems’ prefix for all your column placeholders. This will ensure that all items are modified by your formula.
1: {BoardItems.Name}=FIRSTCASELOWER({BoardItems.Name})
2: {BoardItems.Email}=LOWER({BoardItems.Email})
3: {BoardItems.CaseNumber}=LEFTPAD({BoardItems.CaseNumber},6,0)
Since all the columns are prefixed with ‘BoardItems’, you only need to run the formula once. Simply use the ‘Run’ button directly from the Syntax Editor, and watch your imported data format itself as if by magic.
Step 3: Filter
For the final three steps, create a formula named ‘UpdateTarget’. This formula will need to be executed on each imported item in Step 5 (contrarily to the one in Step 2 which handled all items at once).
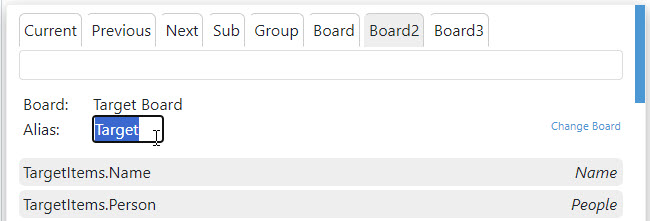
Because you will be reading and updating items on a different board from the one where you create the formula, you will need to gain access to that other board. For this, open the Column Selector and open the ‘Board2’ tab. Click the ‘Select’ button and select the Target board. Change the ‘Alias’ from Board2 to Target.


You now have access to all items of the Target board and their values through the ‘TargetItems’ prefix.
To be able to update records on your Target board, you need to identify the key to match items between both boards. This key could be the item’s name on both boards, or a unique identifier, stored in the name of the imported record and in a Numbers column of the Target record. The specific type of key doesn’t matter. You could even use a key combining columns.
For this example, we will use the item names as the key.
1: –Retrieve Matched Item’s Position
2: [P]=FINDPOSITION({Name},{TargetItems.Name})
3: [P]=IF([P]=”0″,CREATEITEM({Name},”New Items”,”Target”})
These lines are important to understand. Line 2 reads like this: find the position of the item’s name (i.e., the imported item’s name) in the list of all target item names and store it in [P]. Line 3 continues as follows: if [P] equals 0 (i.e, no match found), create a new item in the ‘New Items’ group of the Target board and store its position in [P].
So, regardless of whether a match was found, we now have an item to update with our imported data. This item is located at position [P] on the Target board.
The [P] value is essential for the rest of the formula.
If you don’t want to create a new item when no match is found, replace line 3 with this one:
3: [-]=IF([P]=”0″,STOP())
Now, we can apply some filters as needed. For instance, imagine you don’t want to update an item whose closing date is in the past.
4: –Filter the updates
5: [-]=IF({TargetItems.StartDate#[P]}<=TODAY(),STOP())
See how we use the Position Indicator #[P] to read the value corresponding to our match on the Target board. A Position Indicator is a numeric value, stored in this case as a variable, preceded by a ‘#’. For instance, while {TargetItems.StartDate} would retrieve the list of all Start Dates on the board, {TargetItems.StartDate#[P]} retrieves only the specific date you want.
In other words, line 5 operates as follows: If the Start Date of the matched item is today or has already passed, the formula stops executing.
Step 4: Transform
Before running the formula for each imported item, you may need to transform its data. Here are a few examples of typical transformations.
6: –Transformations
7: {TargetItems.StartDate#[P]}={StartDate}
8: [Rate]=IF({TargetItems.Rate#[P]}=””,{Hourly Rate},{TargetItems.Rate#[P]})
9: {TargetItems.Rate#[P]}=[Rate]
10: {TargetItems.Hours#[P]}=SUM({Hours Spent},{TargetItems.Hours#[P]})
11: {TargetItems.Timeline#[P]}=TIMELINE({StartDate},{EndDate})
12: {TargetItems.Priority#[P]}=IF({Priority}=1, “Low”)
13: {TargetItems.Priority#[P]}=IF({Priority}=2, “Medium”)
14: {TargetItems.Priority#[P]}=IF({Priority}=3, “High”)
15: {TargetItems.Priority#[P]}=IF({Priority}=3,GETPEOPLE(“John Doe”))
- In line 7, we simply update the Target StartDate with the imported StartDate.
- Line 8 checks if the Target Rate is already set; if it is, we store it in the [Rate] variable. If not, we assign the imported Rate to [Rate]. Then, in line 9, we update the Rate column with the [Rate] variable.
- Line 10 adds the imported Hours Spent to the existing value in the Hours column.
- Line 11 sets the timeline column using the imported Start and End Dates.
- Lines 12 to 14 convert the imported numeric priority into a value for the Target Priority column.
- In line 13, we assign John Doe to the item, but only if the priority is high.
Step 5: Update (1 formula – 0 automation)
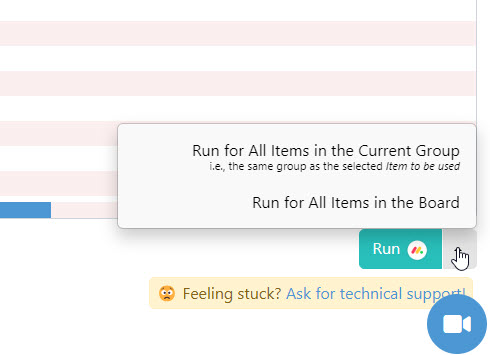
As mentioned before, this formula needs to be run for each imported item. You might wonder if you need to set up one automation, or even 50 automations if you have 50 imported records.
Not at all! You can run it with just one click of a button, directly from the Formula Editor.

Conclusion
Once again, we hope to have demonstrated the power and versatility of the Advanced Formula Booster. It can be used in numerous applications, including playing a critical role in facilitating data imports into your monday.com board—a contribution particularly valuable for those who need to import data regularly.